MSA (Managed Service Accounts) have been around since Windows Server 2008R2 with the latest incarceration of features being introduced with Windows 2012R2. The Managed Service Accounts in Windows2008R2 offered two distinct features.
- Automatic Password Management (no restart needed if password changes)
- Automatic SPN registration
However, most administrators would not have considered the adaptation as a lot of limitation still remain. MSA’s weren’t supported with applications like Exchange or SQL, cannot be used to run a scheduled task and most importantly cannot be shared across multiple host. In general there was a lack of support from 3rd party vendor.
With Windows Server 2012 gMSA’s were introduced to highlight that these were addressed and the following features are available now.
- A single gMSA can be used on multiple hosts
- A gMSA can be used to run scheduled tasks
- A gMSA can be used for IIS Application Pools, SQL 2012 (or later) and other application
So much for an introduction. A more detailed discussion about gMSAs can found here: https://technet.microsoft.com/en-us/library/hh831782.aspx
Let start at looking at setting up the required gMSA’s for our SQL 2016 installation. As mention a prerequisite is that you must be at least one Windows Server 2012 (or R2) DC in the domain.
Step 1 – Create Global Security Group
This is optional but it will help and automate the process of making the created gMSA available to the hosts that will be running SQL Server as well as managing them.
Go to the OU that holds your respective Security Groups, right mouse click, New -> Group.
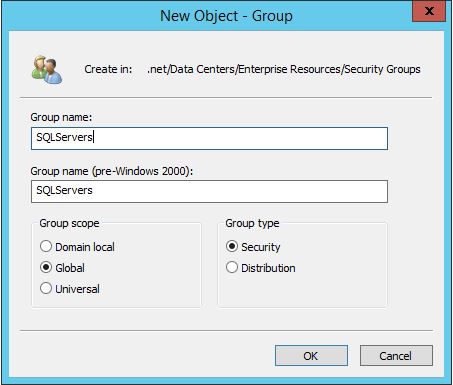


For the Group name I chose SQLServers, Group Scope is Global and the Group type is Security.
It it also good practice to give a explanatory Description for the group.
The next step is to add the domain member servers that will be hosting the SQL Server instance that will be using the gMSA we are going to created.
Note: These member servers will require a reboot in order for their tokens to pick up the membership in the group.
This group will be given specific rights to its members that will allow the member servers to retrieve the gMSA password.
Having done this step will will allow to omit the installation of the gMSA on the member server as the group membership will take care of this. More on this later.
Step 2 – Create the gMSA Accounts
This must be done with a PowerShell Script in a PowerShell Session (make sure you launch with “Run as Administrator” right mouse click) that also has the Windows Server 2012 AD cmdlets available, e.g. installed AD Powershell module. See https://technet.microsoft.com/en-us/library/dd378937(v=ws.10).aspx for guidance. The command that creates the gMSA will also grant the right to retrieve the accounts password to the members of the Security Group created earlier (SQLServers).
If you are creating gMSAs for the first time in your account you will need to add the KDS Root Key as below with the following command line. This is a once off process.
[codesyntax lang=”powershell”]
Add-KdsRootKey -EffectiveTime ((Get-Date).addhours(-10))
[/codesyntax]

Next we will run the command to create the respective service accounts. It is good practice to have different services accounts for every services. Each service should be using a different service account (to prevent the compromise of all services using the same service account if one service account is compromised). For our SQL 2016 installation we will require 4 for the following services/features. You can create additional accounts as required.
- gMSAsqlagt – SQL Server Agent Service Account
- gMSAsqldbe – SQL Server Database Engine Service Account
- gMSAsqlssas – SQL Server Analysis Service Service Account
- gMSAsqlssrs – SQL Server Reporting Services Service Account
[codesyntax lang=”powershell” lines=”fancy” lines_start=”1″ container=”pre_valid” strict=”no”]
New-ADServiceAccount -name gMSAsqlssas -DNSHostName your.domain.controller.com -PrincipalsAllowedToRetrieveManagedPassword SQLServers
New-ADServiceAccount -name gMSAsqlssrs -DNSHostName your.domain.controller.com -PrincipalsAllowedToRetrieveManagedPassword SQLServers
New-ADServiceAccount -name gMSAsqldbe -DNSHostName your.domain.controller.com -PrincipalsAllowedToRetrieveManagedPassword SQLServers
New-ADServiceAccount -name gMSAsqlagt -DNSHostName your.domain.controller.com -PrincipalsAllowedToRetrieveManagedPassword SQLServers
[/codesyntax]

To obtain a current list of principals allowed to download the managed password and to verify the account created you can run the follow PowerShell command:
[codesyntax lang=”powershell” lines=”fancy” lines_start=”1″ container=”pre_valid” strict=”no”]
Get-ADServiceAccount gMSAsqlssas -Properties msDS-GroupMsaMembership | Select -Expand msDS-GroupMsaMembership | Select -Expand Access | Select -Expand IdentityReference
[/codesyntax]
Step 3 – Configure and validate the gMSAs on the member servers
This is a step that might be omitted, depending as to wether you have created the security group in Step 1 and if the member server has been rebooted. In this case the the accounts may already been configured. However, the steps are quite quick and the validation of the account should be considered necessary. These commands also require the AD module for Powershell.
To configure the gMSA account, run the following PowerShell command on the member server:
[codesyntax lang=”powershell” lines=”fancy” lines_start=”1″ container=”pre_valid” strict=”no”]
Install-ADServiceAccount gMSAsqlssas
Install-ADServiceAccount gMSAsqlssrs
Install-ADServiceAccount gMSAsqldbe
Install-ADServiceAccount gMSAsqlagt
[/codesyntax]
This will only work if the Active Directory cmdlet is installed. On a non-DC server run the following command:
[codesyntax lang=”powershell” lines=”fancy” lines_start=”1″ container=”pre_valid” strict=”no”]
Import-Module ServerManager
Add-WindowsFeature RSAT-AD-PowerShell
Import-Module ActiveDirectory
[/codesyntax]
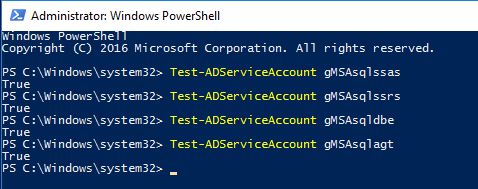
To validate the gMSA account, run the following PowerShell command on the member server and should return True for every account.
[codesyntax lang=”powershell” lines=”fancy” lines_start=”1″ container=”pre_valid” strict=”no”]
Test-ADServiceAccount gMSAsqlssas
Test-ADServiceAccount gMSAsqlssrs
Test-ADServiceAccount gMSAsqldbe
Test-ADServiceAccount gMSAsqlagt
[/codesyntax]
This concludes Part I. The gMSA account have been created and have been verified. Here is and interesting article about any error messages and some more technical details about gMSA’s, particular about how the password is managed.